How To Create The Perfect Cat Eye: Winged Liner Techniques
You know how we both love a dramatic look that turns heads? A perfectly executed cat eye is the ultimate power move in the makeup world – it’s fierce, it’s flirty, and it instantly adds a touch of Hollywood glamour to any outfit.
But let’s face it, achieving that sharp, winged liner can feel like trying to herd cats sometimes. Fear not, we’re here to spill the tea on everything cat eye – from choosing the right tools to mastering different application techniques. By the end of this, you’ll be creating cat eyes like a pro, leaving a trail of envious stares in your wake.
The Power Of The Cat Eye: Why Bother?
Okay, so besides looking undeniably chic, the cat eye has some serious makeup magic up its sleeve:
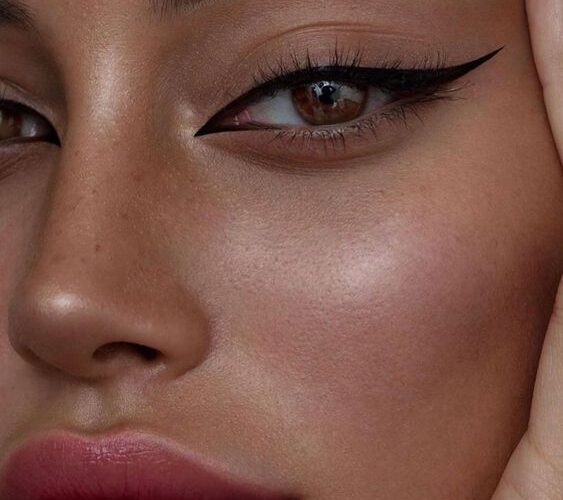
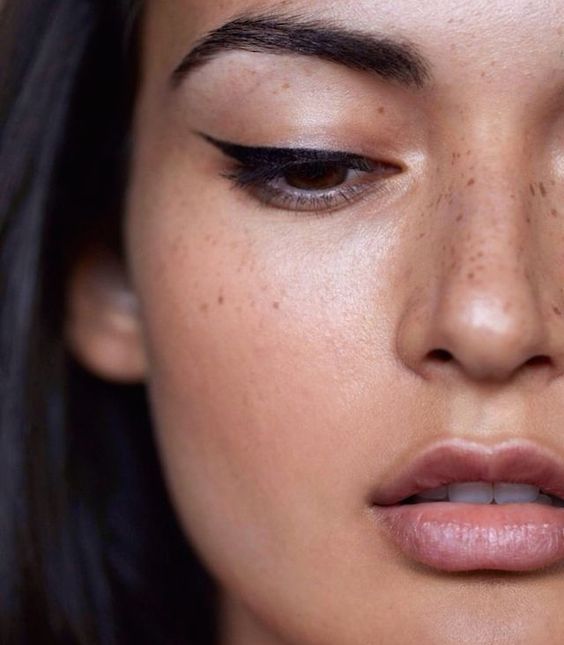
- Lifts And Opens The Eyes: That upward flick at the end of the wing creates the illusion of lifted, more open eyes. Perfect for those days when you feel a little less than bright-eyed and bushy-tailed.
- Elongates The Eye Shape: The cat eye creates a horizontal line across the eyelid, making your eyes appear wider and more almond-shaped. Hello, doll eyes!
- Boosts Confidence: There’s something about a flawless cat eye that just makes you feel powerful and put-together. It’s like a little dose of liquid confidence in a bottle (or rather, a tube!).
Cat Eye Essentials: Tools Of The Trade
Alright, before we dive into the application process, let’s talk tools. Having the right equipment makes all the difference in achieving a flawless cat eye. Here’s your shopping list:
- Eyeliner: This is the star of the show, honey! There are several eyeliner options to choose from, each with its own pros and cons:
- Liquid Eyeliner: A classic choice for experienced makeup wearers. It offers the most precise application and intense color payoff, but it can be tricky to master. For beginners, consider a pen-style liquid liner with a felt tip for easier control. High-End Option: Stila Stay All Day Waterproof Liquid Eyeliner is a cult favorite for its long-lasting wear and precision tip (find it on [Amazon](link to Stila Stay All Day Waterproof Liquid Eyeliner on Amazon)).
- Gel Eyeliner: A great option for both beginners and pros. Gel liners offer a more forgiving application than liquid liners and create a softer, slightly smudged effect. They come in pots or pencils and are applied with a liner brush. High-End Option: Bobbi Brown Long-Wear Gel Eyeliner is a top choice for its creamy texture and smudge-proof formula (find it on [Amazon](link to Bobbi Brown Long-Wear Gel Eyeliner on Amazon)).
- Pencil Eyeliner: The easiest option for beginners. Pencil liners are great for creating a softer, more diffused cat eye. Just be sure to sharpen it well for a precise application. High-End Option: Urban Decay 24/7 Glide-On Eye Pencil offers a wide range of colors, a smooth formula, and long-lasting wear (find it on [Amazon](link to Urban Decay 24/7 Glide-On Eye Pencil on Amazon)).
- Angled Eyeliner Brush: This brush is specifically designed for eyeliner application. The angled tip allows for precise control and helps you achieve that perfect winged flick.
- Makeup Remover: Mistakes happen, honey! Keep a cotton swab dipped in makeup remover handy to clean up any mishaps.
Cat Eye For Beginners: Baby Steps To A Feline Flick
Let’s get started! Here’s a beginner-friendly guide to creating a classic cat eye:
- Prime Time: Apply an eyeshadow primer to your eyelids. This will help your eyeliner stay put all day long and prevent smudging.
- Start With A Shadow (Optional): While not essential, applying a light eyeshadow in a neutral shade can create a smooth base for your eyeliner and make it appear more defined.
- Liner Lowdown: Now for the star of the show! Start by lining your upper lash line from the inner corner of your eye to the outer corner. For beginners, it might be easier to draw a series of small dots first, then connect them to create a line.
- Wing It Out: This is where the magic happens! With your angled eyeliner brush, draw a thin line upwards from the outer corner of your lash line, extending it slightly outwards.
- Channel Your Inner Architect: Imagine drawing a line extending outwards from your lower lash line, as if it continued the angle of your bottom eyelid. This will be the guideline for the wing of your cat eye. Don’t worry about making it perfect yet – a thin, angled line is all you need at this point.
- Connect The Dots: Now comes the fun part! Carefully connect the thin line you drew upwards from your lash line to the angled line extending from your lower lash line. This will create the base of your wing. Remember to keep the line thin and close to your lash line for a more natural look.
- Mirror, Mirror On The Wall: Take a step back and look at your handiwork in the mirror. Are the wings even? Do they flick upwards at the same angle? If not, don’t panic! Use a cotton swab dipped in makeup remover to gently clean up any mistakes.
- Thicken Up (Optional): Once you’re happy with the shape of your wings, you can go back and thicken the liner along your lash line and the wing itself. Build up the thickness gradually, adding more layers until you achieve the desired intensity.
- Set it And Forget It: To prevent smudging, set your eyeliner with a translucent setting powder. Lightly dust the powder over your entire eyelid with a fluffy brush.
- Mascara Magic: Finish off your look with a few coats of your favorite mascara. This will help to define your lashes and make your eyes appear even more dramatic.
Cat Eye For The Advanced Feline: Taking Your Flick To The Next Level
Now that you’ve mastered the basics, let’s explore some advanced cat eye techniques to unleash your inner makeup maven:
The Dramatic Flick: For a more dramatic look, extend the wing of your cat eye further outwards and upwards.Just be sure to keep the line thin and sharp to avoid looking too harsh.
The Double Wing: Feeling adventurous? Try a double wing! This creates a more graphic and edgy look. Simply draw a thin line along your lower lash line, mimicking the shape of your upper wing.
The Colored Cat Eye: Ditch the black and embrace some color! Colored eyeliners are a fun way to add a pop of personality to your cat eye. Experiment with different shades to find what flatters your eye color and outfit.
The Smokey Cat Eye: For a sultry, smoky look, blend out your eyeliner with a smudge brush. This creates a softer,more diffused effect.
Pro-Tips For The Perfect Pounce: Makeup Artist Secrets
Honey, even the most seasoned makeup artists have their tricks! Here are some pro-tips to take your cat eye game to the next level:
Start With A Stencil (Optional): Feeling overwhelmed? There are stencils available to help you create a perfect cat eye shape. Simply place the stencil over your eyelid and trace the outline with your eyeliner.
Use A Spoon (Who Knew?): Hold a spoon against your outer corner of your eye, angled upwards. This will create a straight line as a guide for your wing.
Line With Dots First: For a more precise line, try drawing a series of small dots along your lash line and then connecting them with your eyeliner.
Clean Up As You Go: Use a cotton swab dipped in makeup remover to clean up any mistakes along the way. This will prevent a messy eyeliner situation.
Practice Makes Purrfect: Like anything else, achieving a flawless cat eye takes practice. Don’t get discouraged if it doesn’t look perfect the first time. The more you practice, the easier it will become.
Cat Eye Confidential: Common Mistakes And How To Avoid Them
Let’s talk about some common cat eye mistakes and how to avoid them:
The Uneven Wings: This is a common struggle, especially for beginners. Take your time and focus on creating symmetrical wings. Use a cotton swab to clean up any mistakes and reapply.
The Droopy Wing: If your wing points downwards instead of upwards, it can make your eyes appear droopy.Focus on keeping the line angled upwards for a lifting effect.
The Raccoon Effect: Too much black liner close to your tear duct can make your eyes look smaller and more closed off. Start your liner application a bit further from the inner corner of your eye.
The Overly Dramatic Flick: While a dramatic cat eye is certainly glamorous, going overboard can look harsh and overdone. Start with a smaller wing and gradually build up the length and thickness until you reach your desired level of drama.
Cat Eye Variations For Every Eye Shape
Honey, the beauty of the cat eye is its versatility! Here are some variations to flatter different eye shapes:
- For Hooded Eyes: If your eyelids have a fold that covers your crease, focus on lining your upper lash line as close to the lashes as possible. Keep the wing thin and angled slightly upwards to create the illusion of lifted eyes. Avoid applying liner too close to your inner tear duct, and consider using a lighter shade of eyeliner on your lower lash line to open up the eye area.
- For Round Eyes: To elongate round eyes, create a slightly thicker cat eye with a longer wing. Extend the wing outwards and slightly upwards, following the natural angle of your lower lash line. You can also try a subtle smoky effect on the outer corner of your eye to add definition and depth.
- For Almond Eyes: Consider yourself lucky! Almond-shaped eyes are already considered the ideal shape for a cat eye. You can rock a classic cat eye with a straighter wing, or experiment with a more dramatic flick for extra oomph.
- For Close-Set Eyes: To create the illusion of wider-set eyes, focus on lining the outer two-thirds of your upper lash line. Extend the wing outwards in a straight line, rather than upwards. Avoid lining your entire lower lash line, as this can make your eyes appear closer together. Instead, tight-line your lower waterline with nude or white eyeliner to brighten the eye area.
Cat’s Eye Cravings: Luxury Liners To Unleash Your Inner Siren
Now let’s talk about the crème de la crème of cat eye products. We all deserve a little luxury in our makeup bags, and when it comes to creating a flawless feline flick, these high-end liners won’t let you down!
The Investment Pieces: Liners Worth The Splurge
- Tom Ford Liquid Liner: This luxurious liner is a makeup artist favorite for a reason. The ultra-fine tip allows for unparalleled precision, while the intensely pigmented formula delivers rich, opaque color that lasts all day. Consider it an investment in your eye-conic look!
- Marc Jacobs Magic Marc’er Liquid Eyeliner: This little pot of magic offers a calligraphy-inspired brush for ultimate control. The jet-black formula glides on effortlessly and dries down to a smudge-proof finish, making it perfect for creating sharp wings and dramatic cat eyes.
- Guerlain Eyeliner: Experience Parisian luxury with this opulent eyeliner. The innovative formula combines the intensity of a liquid liner with the ease of use of a gel liner. The result? A rich, long-wearing line that defines your eyes with a touch of French flair.
- Pat McGrath Labs Permaglide Ink Pot: This award-winning eyeliner is a true showstopper. The highly pigmented formula boasts a waterproof, transfer-proof finish, ensuring your cat eye stays put all night long. The flexible brush allows for effortless application, from ultra-fine lines to dramatic wings.
- Chanel Ligne Stylo Calligraphie de Chanel Longwear Intense Eyeliner: Indulge in the ultimate calligraphy experience with this Chanel masterpiece. The unique felt tip allows for precise lines and effortless flicks, while the long-wearing formula ensures your cat eye stays perfect from day to night.
Cat Eye Confidence: The Final Feline Flick
To truly unleash the potential of your luxury liners, you need the right tools! Consider investing in a high-quality angled eyeliner brush for ultimate control and precision. Brands like Charlotte Tilbury and Nars offer luxurious brushes that feel as good as they perform.
From One It Girl To Another, We Should Keep In Touch. Sign Up For Our Emails!
We Have So Much To Update You On. Sign Up For Exclusives, Deals And More.